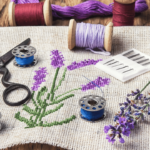
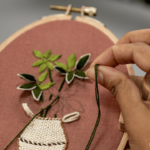
Just took a look at Part 2 of Celtic Solstice Mystery. After all the units like these I just made for Lazy Sunday, I am not looking forward to making more of these.
Why can’t these be strip pieced? The answer: They can!
I did a little math and it looks like I can make these with strips as follows:
- 1 5/8″ strip of green
- 1 5/8″ strip of neutral (the green portion needs to be 1 1/8″ wide for the corners to come out right)
- 1 5/8″ strip of yellow or in my case tan
Sew together the three strips with the green in the middle. Then cut the strip sets at a 45 degree angle, some in both directions to get opposing chevron pieces.
Cut your 45 degree angle slices every 2″ to get the right width. I used my 3.5″ square to measure the 2″ inches and I line up the 45 degree mark on my 6 x 12 inch ruler with one of the green/tan or green/cream seams for accuracy.
Then line up your 3.5″ ruler with the side and the two green points.
Slice off the excess tan and cream and you have a perfect 2″ x 3.5″ unit.
Sew together and press the seam open. A perfect 3.5″ square.
I still have waste triangles of the tan and cream, but no waste green triangles. So I figure I’m saving some amount of fabric and loads of time with this method. My waste triangles are now in my box for the Wild and Goosey paper pieced blocks.
Update:
To save even more time, take two strip sets and press seams in opposing directions as Bonnie suggests. Then sandwich the strip sets together before you slice on the diagonal.
Then you can slice the opposing directions all at once.
Trim by lining up your 3.5″ ruler on the 2″ mark at the end of each seam line where the points form, and you’ll have your units nested together all ready to sew.
Tried this again today and it works perfectly to get your 3.5″ chevron unit with no trimming required.
I’ve added a link to a printable version of this post here.
I’ll hook this up to Bonnie’s Monday Progress post when it goes live.
Enjoy!
PS: Someone asked about the border units for Lazy Sunday. Use three 2″ strips, cut diagonally at 2.5″ wide and it works.
[…] I read a clue on Karen’s blog about an alternate way to piece these. It’s here. I truly admire those people who can ‘see’ a different, easier way of […]
LikeLike
Thank you so much for your tutorial. It really helped a lot. I found that if I sewed the two sides of the chevron together before trimming to 3.5 inches I had less trimming and “better” squares at least for me.
LikeLike
Thank you very much, I tried this , I had to change it from Inch to metric….
I was concerned about the bias, but this saved time!!
I modified your design and went from 3 strips to 5: white green yellow green and white again.
and cut then the yellow strip .
thanks for sharing it .
LikeLike
Thanks for sharing! I love using strip sets – sew much faster!
LikeLike
Hi Karen,
it worked perfect, if you want, you can see for yourself in my blogpost.
Bente
LikeLike
Thank You ! for the strip piecing way to make the chevrons. I just finished making my HST’s for Step 3. I used the strip tube ruler for making them. This method uses 1.75 inch strips and strip piecing. If you are not familiar with this ruler, check it out. With it, I will never consider buying the Lazy Angle Ruler for making HST’s. Now I have to go back and finish Step 2.
LikeLike
OMG! I wish I had seen this before doing all my chevrons! Thanks so much! But if I need to do more- I am printing out your PDF…
LikeLike
I KNEW THERE HAD TO BE A WAY TO DO THEM THIS WAY…..THANKS
LikeLike
The brilliance is hot! I am not participating due to too much work load but have been saving each week’s step. I saved your little awesome and brilliant technique! How nice of you to share! Thanks so much!!
LikeLike
Oh how I wish I had this info before I did clue two. I may have to print it out and save it for future chevrons! 🙂
LikeLike
Thank you for this, but I can not get the printable version to load. Any hints on how to get it to load?
LikeLike
karen thks fir sharing but… i feel embarrassed, have made hundred quilts but am doing something wrong here. i tried and the block measures a nice 2,5 by 3.5 . maybe it is age but where does it go wrong? pls help, thks again, annette
LikeLike
What measurement did you use when you made your diagonal cut? It should be 2″.
LikeLike
Several people have asked how to print these instructions. I’ve added a link to a printable version at the bottom of the post.
LikeLike
You are my Hero. I know some like to sew those tiny pieces together,,,,,me…not so much. Mine never come out right. Your method for strip piecing is genius!!!
LikeLike
Thanks for this great idea, unfortunately, my chevron squares are already finished, but they sure were tedious! I’d love to use your method in the future.
LikeLike
I wish I had seen this BEFORE I started this step! Thanks for the tutorial!
LikeLike
I might do a couple this way to see how I go – I wish I had made mine wider and trimmed back
LikeLike
I did think about this idea but working out the maths seemed too hard , so thanks for working it out! I done 80 of these blocks a lot quicker.
LikeLike
Awesome!!! Thank you for sharing your creativity and talent!!!
LikeLike
You are so clever. Thank you for figuring this out and your willingness to share with the rest of us.
LikeLike
Hi I just found out from reading the comments we live in the same general area I am in Benicia
Loved your strip piecing idea
I haven’t started just picked my colors
Mine are pastels ( soft baby colors) blue green pink yellow and Kona snow for neutral
Thank you
Colleen
LikeLike
I am about to do my border for Lazy Sunday. Can you help me with the strip sizes and particulars? I would love to see your if it is done 🙂
Thanks!
LikeLike
I have more units to make for Lazy Sunday. I’ll work out the strip sizes and let you know. May not be till the weekend though.
LikeLike
Thanks ma’am! I still have to sash it.
LikeLike
It’s a pdf and should open in Google Docs. You don’t need a Google docs account to see it.
LikeLike
Wow – that was a true light bulb moment! I have a template for a spinner block that is made with strips similar to this but couldn’t figure the math out to make it smaller. So much less wasted fabric! Great job! Thanks for the post!
LikeLike
What a brilliant idea! I had already cut and sewn mine when I found your link. But I think it would make an amazingly quick Baby Quilt and can’t wait to try it out….Thanks for sharing
LikeLike
Karen, I am so glad there are people like you that are so smart and share so freely. Thank you much
I just have to try this.
May,Michigan
LikeLike
Brilliant idea. Thanks for sharing!
LikeLike
I’m going to print this off so I can attempt it later. Such a bright idea!
LikeLike
I am all in when it comes to short cuts. My BFF in Texas always does the easiest and quickest route to cutting/sewing. Thanks for sharing, and I’m looking forward to the NEXT big tip!!
LikeLike
This will work if you don’t mind having same fabrics together. I may try this and mix up the strips every so often.
LikeLike
Exactly right. Mine is going to be a bit more controlled scrappy. I’ll be mixing in some different greens a strip at a time. And, my cream and tan are all the same.
LikeLike
Thank you so much for sharing this info. Too bad I already cut out the pieces, & am now about to attach them. Your method looks so much easier & accurate.
LikeLike
I’m sure this won’t be the last time Bonnie uses this unit in one of her quilt patterns. 🙂
LikeLike
Great idea I”m going to try this thanks for sharing. Happy quilting.
LikeLike
Thanks for sharing this ingenious tip! This little block is so cute that I’m sure I will make it for a border sometime so your instructions will definitely come in handy!
LikeLike
Thank you very much, I will try this tomorrow.
Very kind of you to share with us!
hugs
Bente
LikeLike
Wow, thanks for the tips. If you are near Southern California, message me i’m looking for someone to sew with on this project. I’m in the San Diego area.
LikeLike
Darn, I’m near San Francisco. It would be a long drive to get together. Though, I’d love to have someone to sew with too.
LikeLike
Great tip! I wish I had seen this a few days ago, though. I’m going to “pin” it in case this comes up again!
LikeLike
Love the idea. I am concerned about the bias. Did you cut your strips on the bias so that when you piece them they will be on the straight of grain? Just a thought.
LikeLike
No, I didn’t cut on the bias. I knew I would have bias edges going into this. But they did’t concern me, and I had no trouble with stretching while sewing the seams and pressing the units. I’ve also heard starching the strips before cutting can help with bias edges, but I didn’t do that either.
LikeLike
I think I will try one each way and see how it goes. Thanks!
LikeLike
Thanks for this tutorial. I had been wondering how this could be done a little easier. Haven’t been able to get started yet but I will be using Christmas fabrics.
LikeLike
Amazing what we will do to avoid drawing those multiple lines! Great thinking.
LikeLike
Great idea, thanks for sharing!
LikeLike
This is brilliant!
LikeLike
Brilliant!!!!
LikeLike
You are a genius Karen! I think Bonnie should have you test her pattern next year 🙂
LikeLike
Thanks. I wonder if she has pattern testers. She never mentions it.
LikeLike